Sunday, June 1, 2014

Supporting Relay For Life

Most of you reading this know that Julie and I are both involved with fundraising and supporting the American Cancer Society through Relay For Life. Julie's day job is with the ACS and I volunteer for the Bedford Relay For Life, which has been held at my school for the last two years.

Even though our crafting is a way for us to spend time away from our day jobs, we do find opportunities every now and then to make things that we use to support the ACS and their efforts to finish the fight against cancer. Julie has even hosted some Thirty-One parties to support Relay events in our area.

Earlier this year, I started some new sting art projects during my snow days off from school. These projects incorporate some painting and my nail-and-string designs, and are much larger than my usuals. The one pictured below is 24" x 24" and is freestanding as a display item. There are about 150 nails in it and many, many yards of thread.


You can purchase the HOPE string art from our SatterThings shop on Etsy, and all of the proceeds will be donated to the American Cancer Society's Relay For Life. If you're around the Roanoke area, let me know before you buy and we can wrk out a delivery plan to help you avoid paying the shipping cost on this large item. 

As always, please feel free to email us, find us on Facebook, on here, or on Etsy to talk with us about custom items, or about getting involved with Relay For Life!

-Will


Saturday, January 11, 2014

Christmas Gifts - Up-cyling

Whoops I'll try to update this more often...

Every year one side of Will's family does a gift exchange (too many cousins to give gifts to all of them) and it always has a theme, this year's theme was "Up-cycle".  Well most of the projects I do aren't up-cycle - even though yes I do turn yarn into fashion accessories and ribbon into wreaths, that didn't really count - Will's projects are.  We had two names, Victoria and Aunt Shellie, to make gifts for but he had the perfect ideas. Here are the two projects/gifts:

Twine wrapped bottles

Victoria is a Sophomore at The College of William & Mary. Will took a standard Champagne bottle and wrapped it in green landscaping twine, and then stenciled on the W&M athletic name "Tribe". And then he took two small Champagne bottles, wrapped them in Jute twine, and then stenciled on her graduation year "16".


"I was wandering through Lowe's one day and found their dark green jute landscaping twine"
"Contact paper is my favorite stencil material for these projects; it's easy to cut with an craft knife and form fits the curved surface really well. It's also really easy to put through our Cricut for simpler projects, like our flower-stenciled bottles." - Will


 "When Tori unwrapped her bottles, she wasn't sure if she was getting a 16 for her graduation year or the "1693" for the founding of the school."
"By the way, these are 187mL champagne bottles from Barefoot. I wanted to make sure that they matched the shape of the larger bottle, and Julie likes bubbly pink wine." - Will.
It's true I do love bubbly pink wine!

String Art
Will made the first last name string art for our friend's wedding last year and he had been wanting to make another. This time instead of picking a random script font in Pages, he conspired with his cousin's to get Aunt Shellie's handwriting - specifically "The Gums" in her handwriting.  This turned out to be quiet the adventure (too long to type here).

"There are just over 300 nails in this string art.
They have to be closer together than some of my other ones to keep the curves of the letters recognizable." - Will
I'll share more pictures and behind the scenes commentary on other handmade Christmas gifts we gave this year in another post!

Thanks for stopping by,
Julie

Saturday, November 2, 2013

Blankets: Helping those in need

One of the really great things about being crafty is making items that will help someone else in a time of need. I want to share one of those projects with you.

My cousin Brittany works for the Rape Crisis Center of Central New Mexico in Albuquerque, NM.  Their mission is:
"To provide support and advocacy to Survivors of sexual assault and abuse within the greater Albuquerque area, and to serve as a community resource on issues regarding prevention and awareness of sexual violence."
Full size adult blankets if fun colors and a
smaller Batman one in case a child is in need.
One of the ways Brittany and the other staff help  these individuals is by providing what seem like small necessities in life to the rest of us but actually mean the world to the survivors. They keep on hand soaps, shampoos, and other toiletries so the survivors can shower following their exam. Think about all those travel size ones you pick up at hotels and never use, they can use them!  What we've been working on though, aside from looking through travel bags for those shampoo bottles, is making no-sew fleece blankets.  The blankets serve both as a security item when everything else feels taken away, and as something positive to take home. Many of the survivors are low-income or even homeless, so a single warm blanket may be all they have to help them feel safe and at home once their interview/exam are over.


They are double layered to provide as
much warmth and comfort as possible.
We have made a few so far and have more fleece to make more, but I'm asking our readers for help. If you are crafty will you take the challenge to make a few blankets? If crafts aren't your thing will you take the challenge to supply us with the fleece to make them?  Shampoo, soap, blankets...they seem like simple things but when your world is turned upside down and you're left with nothing, they are everything you have left to cling to.

(Making the blankets is easy, I followed this blogger's post.)


If you are interested in making blankets yourself, donating unused toiletries, or sending me fleece feel free to email satterthings@gmail.com and I'll send you the appropriate info.  Let's help make the world a better place one blanket at a time.

-Julie

Monday, October 21, 2013

Whoops, been a while - we got a second dog!

Whoops it's been a while since we last posted! I promise a crafting post is coming very soon, I have one in mind I just need to upload the pictures to go with it.

One of the reasons we haven't updated in a little while is we rescued a second dog back at the beginning of September!

Meet Luke!
Luke joined our family on September 11th.  He is a 2.5+ year old Foxhound rescued by Angels of Assisi. Prior to his rescue, Luke was at the pound for a months, and a stray before then. When you meet him you would have never guessed he probably lived for a while on his own or may have not had a real home for a long time.  He is incredibly sweet and loves to cuddle (even though he's rather large).  We're still trying to get his weight back up but his fur is getting soft again and he looks so much healthier.

Maddy and Luke play like brother and sister - you probably wouldn't guess at first they aren't related! We love both of our hound dogs and even though they can collectively take over the whole couch leaving Will or I (mostly Will) sitting on the floor, we wouldn't have it any other way.

Just taking a nap on the couch.
Like I said I promise a crafty post is coming soon but just wanted to give you all a quick update! Oh and Maddy is almost TWO (her birthday is November 28, 2011).

-Julie

Friday, August 30, 2013

Decorations - Hokie Style

Anyone who knows us knows we love Virginia Tech, after all that's where we met! Now we don't have any VT colored cars or walls painted maroon & orange, but we definitely don't hide our Hokie pride. We have VT decals/magnets on our cars, a Hokie Bird door mat, and just a "few" maroon & orange shirts.

When we first started decorating our home, finding places for our indoor VT decorations was a top priority! I started first by figuring out where to hang a few of the larger pieces: poster size print of the Marching Virginians making the VT on the field at Lane Stadium (I'm on the right 40!), and two wall hangings.

Then as we got settled in I started to add smaller pieces and make a few of my own.  I love the way maroon & orange look with our brick home and black accents, they are perfect!  One of the newest things I've made is a mesh ribbon wreath. I had never heard of mesh ribbon until about a year ago and wasn't quite sure how people used it, but thanks to Pinterest I quickly learned how and of course maroon & orange were my first color choices. I took a few progress photos of the wreath to share:

Two rolls of mesh ribbon, and one wire wreath form (not my favorite version of it, need to find a blank one next time).
After making loops and attaching them with the "garland" this was the final product.
I then topped it off with a maroon painted S and white bow.
So the goal had been to put the mesh wreath on the front door for football season, but it doesn't fit between the door and screen door...whoops.  So I moved a different wreath (a purchased) one to the front that did fit.
Let's Go Hokies!
Here are the last few VT touches to the front yard:
Another use for the mesh ribbon - accent to our brand new HOKIES flag!
VT Gnome is ready for Gameday!
There will definitely be more VT accents added to the home, no worries there.  Another project involving maroon & orange will mostly likely be very soon and I'll make sure to blog about it as well.

It's almost time to start jumping...LET'S GO HOKIES!

Monday, August 26, 2013

Behind the Scenes: Delabeling the Bottles

I mentioned in my first post that, when it comes to making things, I enjoy working with things that aren't what people normally think of when they hear the term "crafts." I don't work with paper, or knitting needles, or beads. I prefer things like wood, nails, glass, twine, and resin. One of my favorite things to do lately is to upcycle empty glass bottles.

So far, my projects with bottles have involved wrapping the bottles in jute twine and adding some sort of accent. You can see examples of both the twine-flower and the stencil-flower versions of my bottles in our Etsy store.

One of the necessary evils in working with empty wine and beer bottles is that I have to remove the labels. Until now, that has meant soaking the bottles in warm, soapy water and going at it with a razor blade. (Side note: This makes Julie very nervous. And considering the number of times I've injured myself doing it, it should.) Fortunately, I came across this blog post from Healthy, Wealthy & DIYs and it made a world of difference.

Before. Apparently we like Barefoot. And Starbucks.


After. More info about what worked and what didn't below

It was SO much easier than just warm, soapy water! All I needed was a rough washcloth and the adhesive came right off. The other trick that I picked up on was filling the bottles with hot water before soaking them. From what I can tell, it helped break down the adhesive more and kept the bottles underwater better (duh, Archimedes).

And now the awards:

Easiest Label to Remove: Sequin Moscato (polka dots). One of the labels actually fell off on it's own in the water. I'm excited that I didn't have to scrub that one — I have plans for those polka-dots.

Hardest Label to Remove: Barefoot Pinot Noir (far left, pale green). I scrubbed, and scrubbed, and scrubbed. There's still adhesive all over the front and back. It's clean enough to wrap in twine, though!

Dishonorable Mention: Starbucks Frappuccino bottles. Turns out plastic labels protect the adhesive really well.

The best part of it all? I have sixteen more bottles ready for upcycling, and no bandages on my hands! Whoo hoo!

Wednesday, August 7, 2013

Decorating Our Home

One of the really neat things about moving (and I've done a lot of that in my life!) is getting to decorate a place to reflect you and your family.  Growing up that meant for me getting to set up my room a different way after each move or buying new sheets to match my new room.  But as an adult and purchasing your first home that means getting to decide how EVERY room in the house is set-up and even getting to pick paint colors!

When we decided on which house we wanted to buy we immediately started to think about if & when we wanted to paint, what colors we wanted to use, what furniture we needed, and where stuff was going to go.  Because we were leaving a 900 square-foot apartment we knew we weren't going to have all the furniture necessary to begin to fill our new home, so we made specific rooms priorities over others.  The first one on the list - master bedroom. 

*Master Bedroom
We love our bedroom furniture, its all from the same line of furniture from Ikea (if you've never been to an Ikea go to one ASAP, they are awesome!) and it's this beautiful shade of reddish brown. All of the bedding we already had was shades of browns and cremes with hints of light blue.  Since this room was priority #1 we picked out paint colors before we moved in and Will set to work painting as soon as we had keys.  Three of the walls are "Moroccan Moonlight" and the fourth is "Puppy Paws".  After we got the furniture moved in we started to brainstorm what we wanted to put on our freshly painted walls.  I love spending time on Pinterest and one of my favorite categories is Home Decor. I found on there a few different pins about picture collages and those sparked the idea of doing a picture collage above our headboard of our engagement and wedding photos.
It was hard to pick just these 11 pictures!
Our photographer William Mahone did such a beautiful job with the pictures and the colors were perfect for our bedroom.  All of the frames came from Ollie's and are mismatched on purpose. So far that's the extent of the decorating, we're in the hunt for artwork for the largest wall to add some more pops of color to the room.

*Living Room
Top: Wedding day items and sits above the TV
Middle and Bottom: Favorite photos and personal mementos

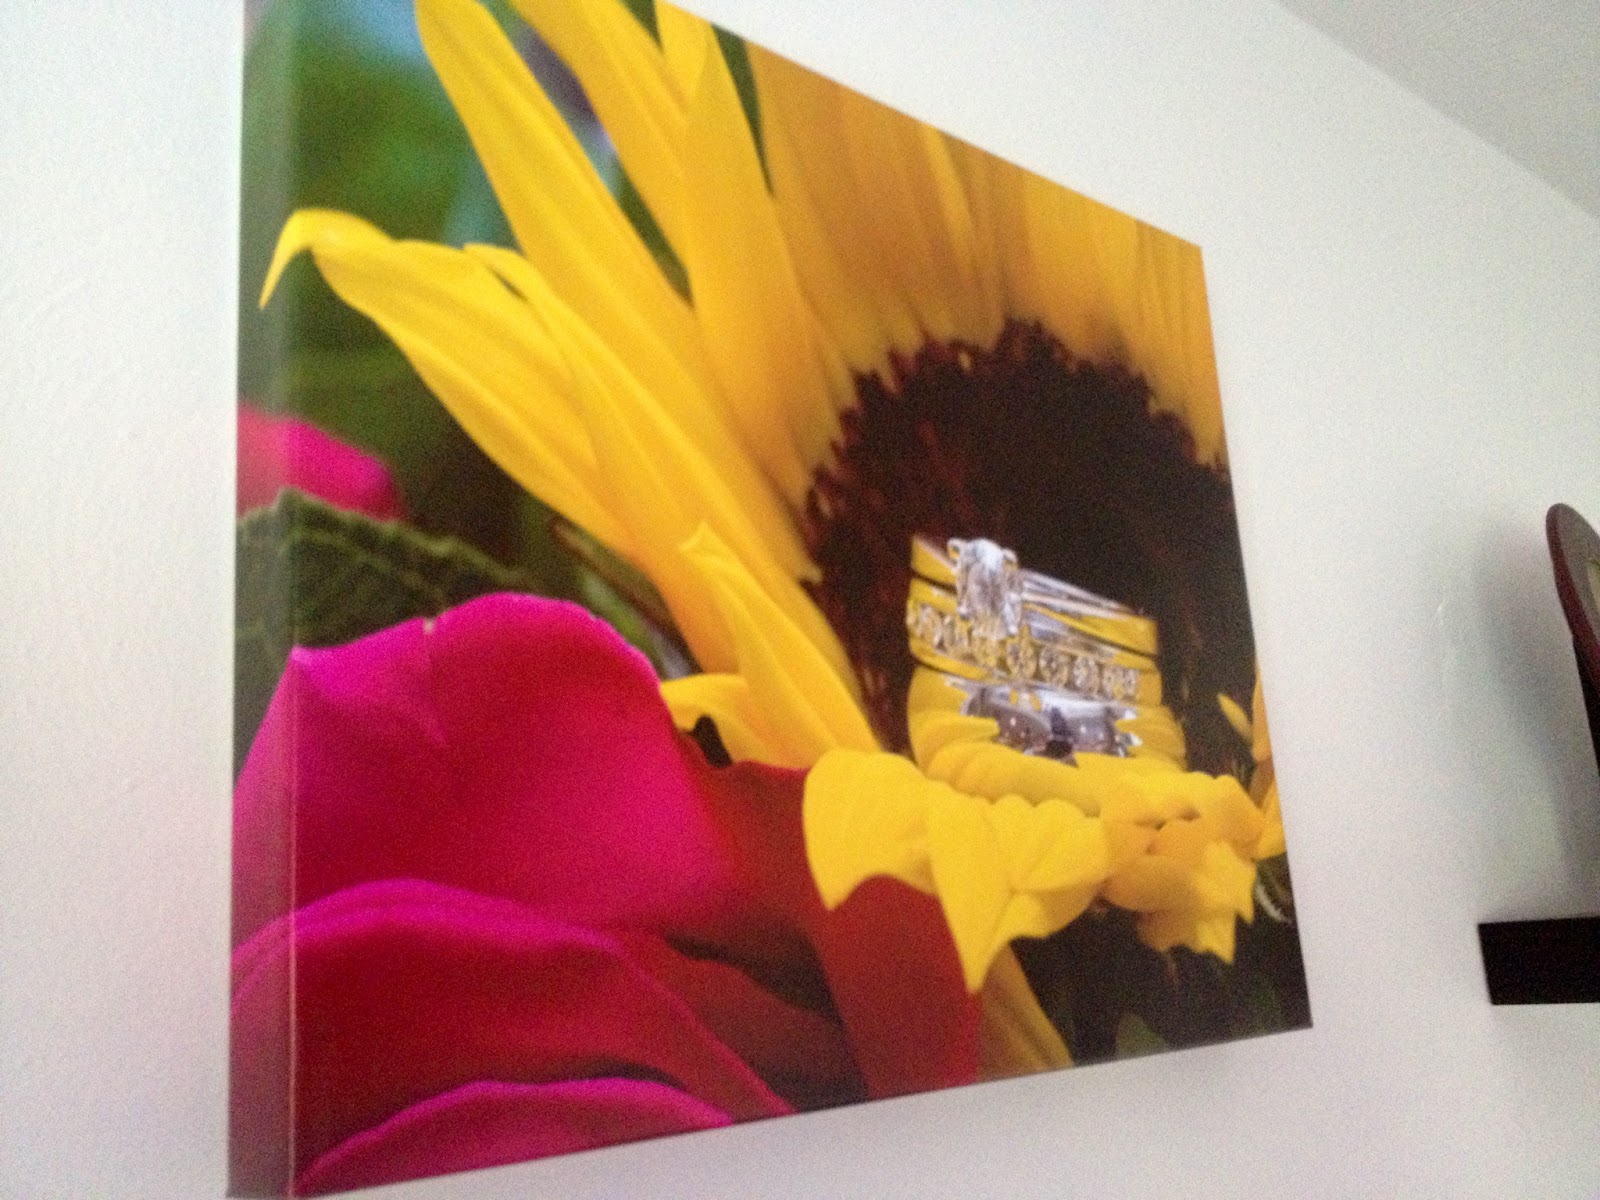
The next room we were excited to get decorated was the living room.  The biggest thing we wanted to add to the room were floating shelves to help not only display our photos and other items but to also help breakup some of the large white space of the walls.  We didn't decide to paint this room because were weren't sure what colors we wanted yet - we are now already thinking of doing just one wall a color but haven't picked the color.  We got three floating shelves from Ikea (again love that store! wish it were closer...) and after much frustration trying to find studs in the walls hung two behind the couch and one above the TV. The two behind the couch frame in my favorite part of the living room! Ever since I saw this picture from our wedding I knew I wanted it blown up and put on a canvas for above the couch.  It's absolutely stunning! Take a look:
Easily one of my favorite photos from the wedding! Thanks Bill!
The rest of the living room is a work in progress - we have few VT items hung up, some more pictures, and eventually really neat green curtains will frame in Maddy's window.

We've started work on a few other rooms in the house - Master Bathroom has a neat new shower curtain and has a future DIY makeover that I'm sure will get it's own post, the Guest Bathroom will be neutrals, the Office right now is pretty standard until we decide on a new desk, the Guest Bedroom is the next project that I'll let Will share with you all (lots of Pinterest ideas and DIY coming soon!!), and the basement needs some organizing and eventually will house the Craft Room!!  The last room in the house is the Kitchen.  We didn't have to do much here because it's already bigger than our old one and mostly white.  We have put up a few pictures and purchased a wine rack for our apparently growing collection.  The neatest thing we have done is take the chalkboard from our anniversary photo and mounted it to the refrigerator to be our weekly menu and reminder board:
Look even blogging made the To Do list!
We update the board each Sunday with the meals for the week which has turned into a nice habit and helps to keep impulse buying at the grocery store to a minimum when you've got a plan. 

We aren't done decorating the house yet but that's the fun thing about decorating, it takes a while and it's what you want it to be!  Most of the ideas we have planned or have done come from Pinterest - this has allowed us to do a lot on our own instead of just buying something and hanging it on the wall. We've noticed our home matches Maddy really well, which doesn't surprise me because we love her and she's apart of our family too so it's only natural that our color palette has migrated that way as well: white mixed with browns and blacks, and the occasional splash of color.

Thanks for letting me share a little peek into our home decor, I'll share more as we tackle new projects.

-Julie